Decadence.

This evening it was too humid to go for a run so I settled for a chocolate milkshake instead.

IMG_3946


Choco Chip Milkshake

Makes 1 serving
Prep time: 5 mins
Cook time: 2 mins

1 cup almond milk (sweetened or not, whatever suits your indulgence)
1/4 tsp vanilla extract
2 tbsp maple syrup (or other sweetener of your choice)
1 tbsp nut butter (I like almond)
1 tbsp cocoa powder
1 frozen banana
3 ice cubes

1/4 choco chips
2 strawberries, chopped
Generous spoonful of coconut whipped cream

  1. Throw all the ingredients into your blender and blend on high until smooth.
  2. Pour into fancy glass (treat yo self!)
  3. Top with choco chips, strawberry and whipped cream. YUM.
  4. Add a straw, a long spoon and relaxxxxxxx 🙂

Sunday brought to you by Oh She Glows

Well, not literally. But if you read that title thinking, “everything she ate today must’ve been inspired by that great vegan and gluten-free blog/cookbook” then yes, you may take it literally.

Because today I went on an Oh She Glows kick and it’s had me feeling all domestic. Maybe it’s the rainy weather, maybe it’s the yummy food or maybe it’s having the apartment to myself and blasting old school hip hop while I heat up the kitchen. Ok, maybe the last part doesn’t exactly fit the definition of “domestic” but whatever, it made me happy.

Sunday mornings I try to make something nice and different for breakfast; throughout the week I usually stick to my trusty Green Monster smoothie or cereal, if I’m giving the Vitamix a break. So Sundays are when I flex my vegan breakfast muscles.

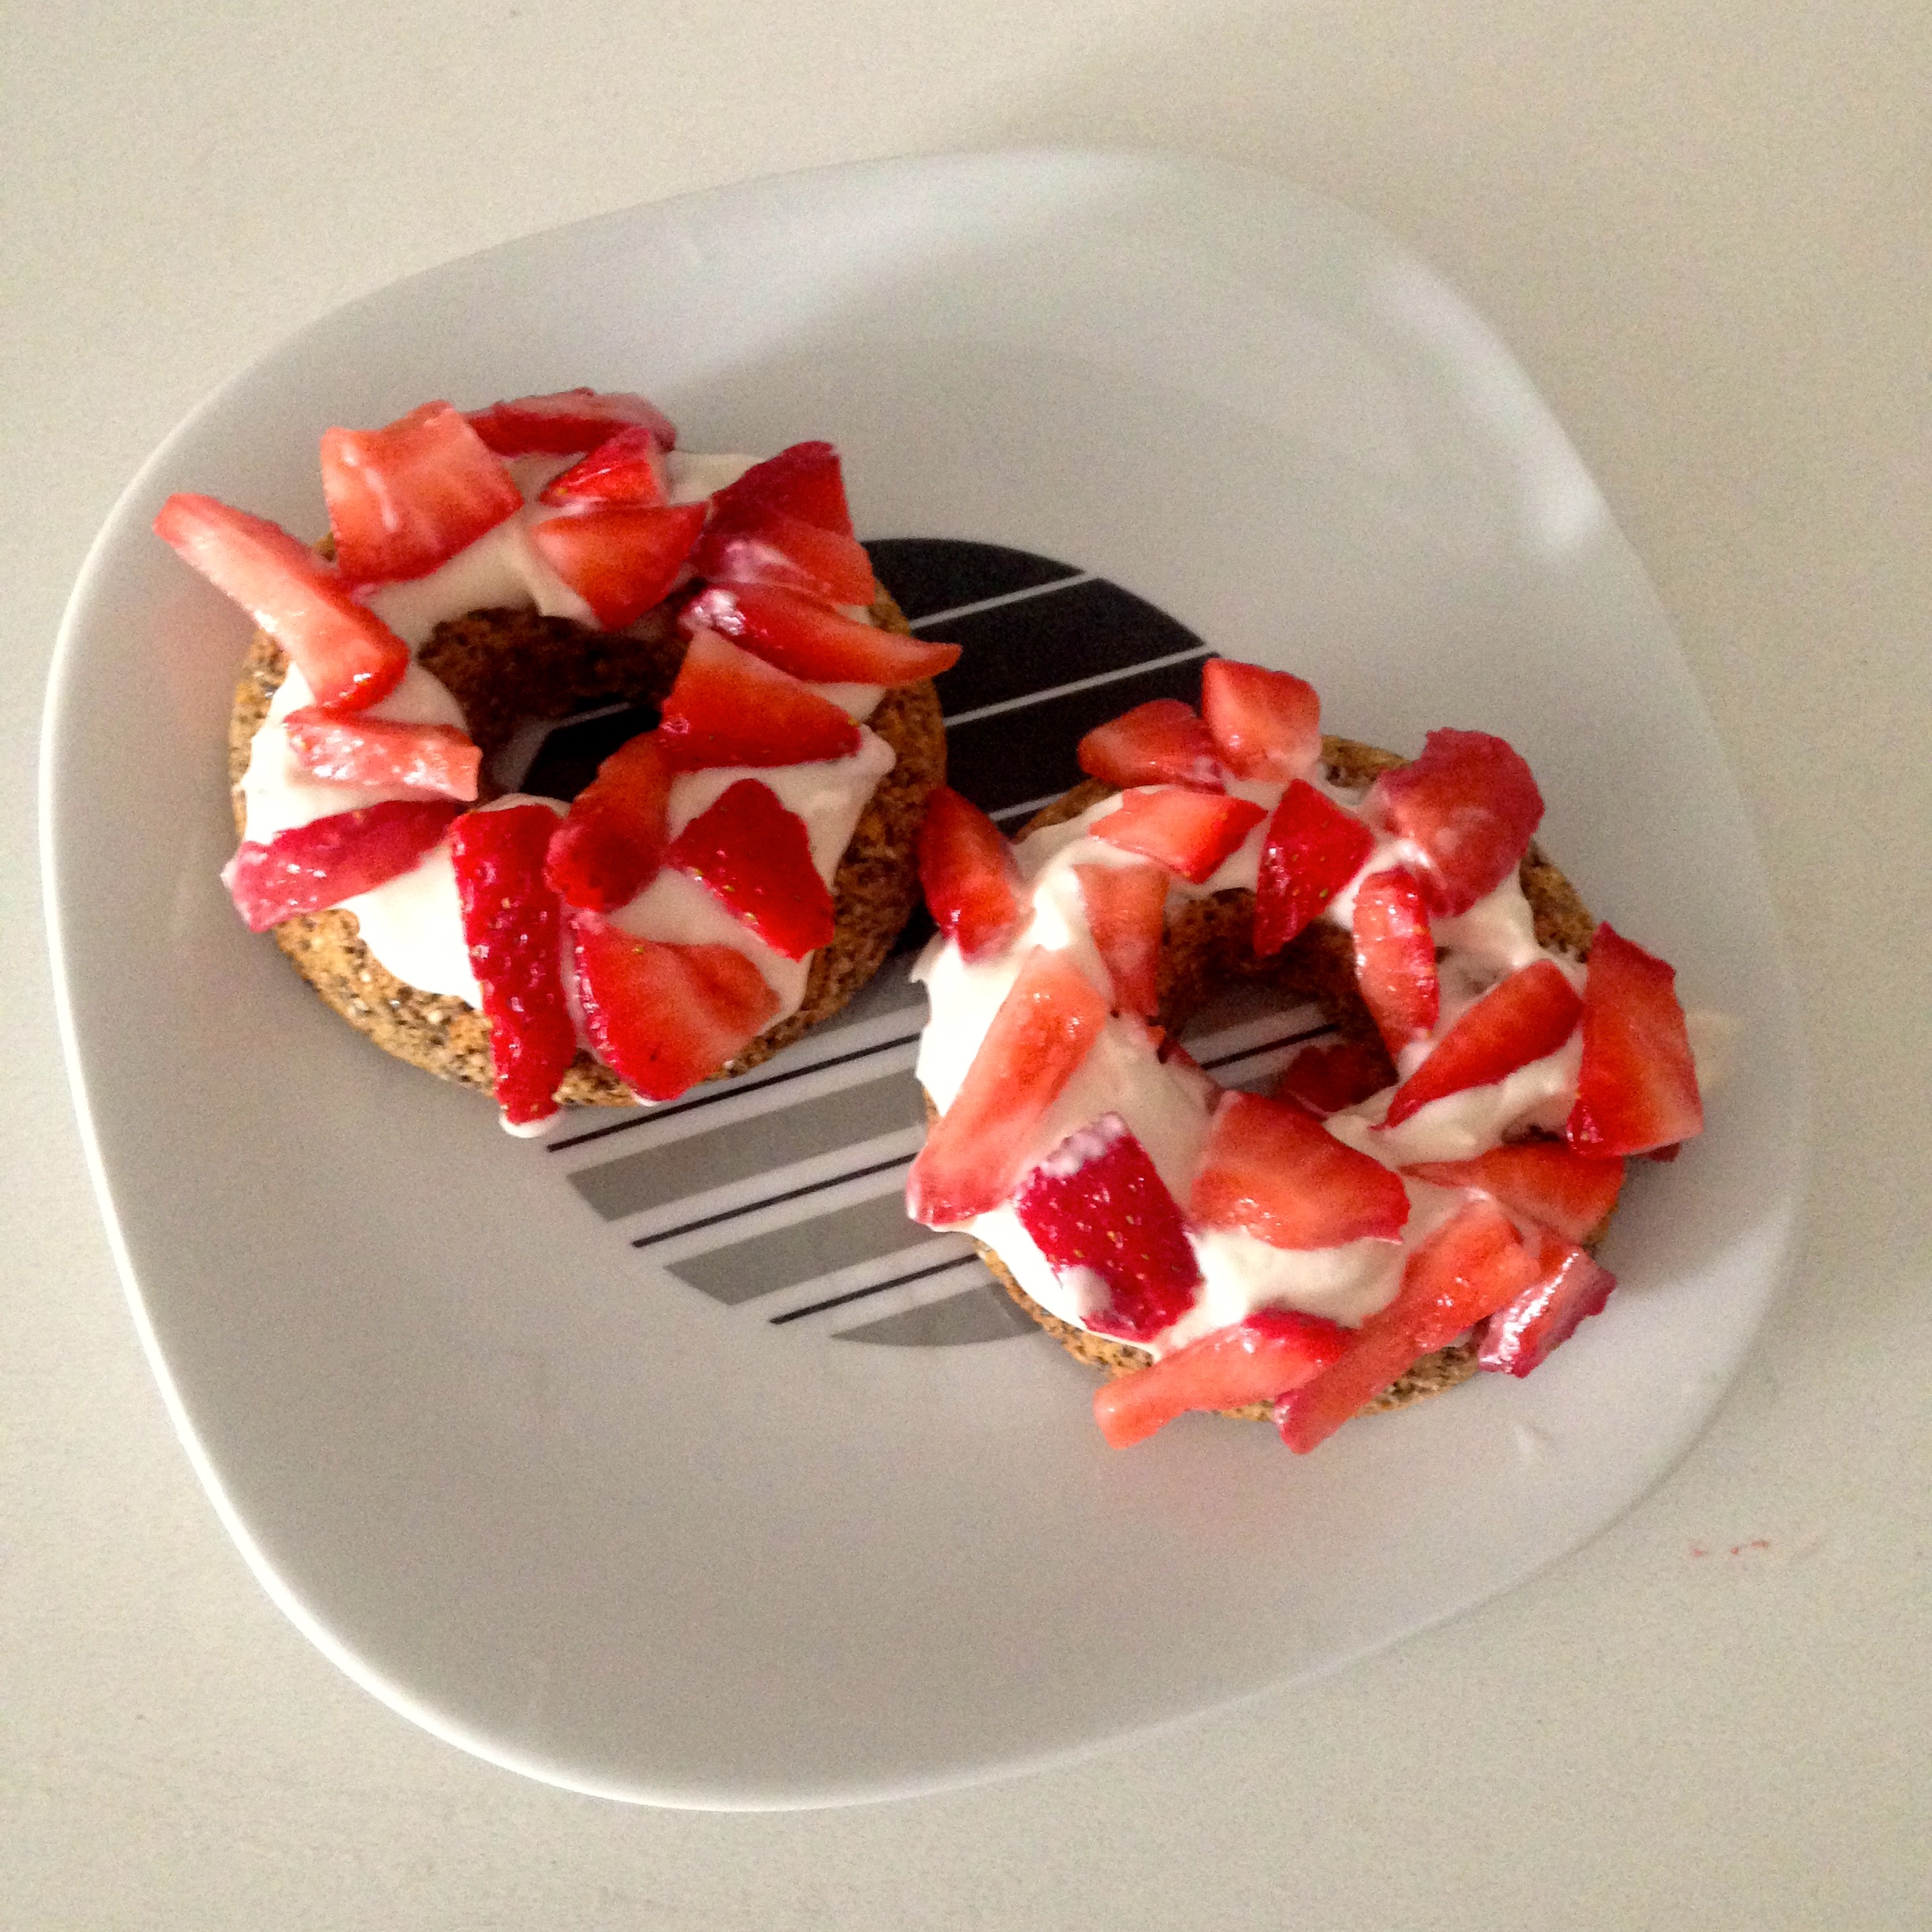
And this Sunday was no exception. Last night I flipped through the Oh She Glows cookbook and decided to try her “Out-the-Door Chia Power Doughnuts” with Coconut-Lemon Whipped Cream for breakfast today. Thankfully there’s a 24-hour grocery store nearby so I popped over for some midnight grocery shopping to grab all the ingredients and this morning it was go time!

IMG_3929Look at those beauties! A fantastic way to start the day, if I do say so myself.

The doughnuts don’t have any gluten, sugar or oil. They’re baked in a doughnut pan (or, if you don’t have one, a muffin tin) and are light, fluffy and a little crunchy thanks to the chia seed. So not only is it decadent but it’s also pretty healthy! 5-star rating from me, for sure.

Angela doesn’t share the recipe on her site so I’m not going to share it here; you’re gonna have to buy the cookbook yourselves if you want to try it.

But I will give a tip about the coconut whipped cream (which is on her site). Angela recommends using a hand mixer to whip the coconut milk but, alas, I do not own one. So I had to call in the Vitamix. A risky move considering the Vitamix creates a lot of heat that can quickly turn your coconut whipped cream to coconut milk soup.

So here’s the tip: if using a Vitamix (or similar type of blender) add the solidified coconut milk, vanilla extract, maple syrup and blend on high for no more than 12 secondsJust enough time to whip all the ingredients and get that desired consistency, but not enough that it starts to get too hot up in there.

Also, that coconut whipped cream is dangerously good. Like, lick the bowl kind of good. Eat alone with a spoon kind of good. Use as — ok I think you get the point. It’s really, really good. So once you master the preparation of it I think it’ll be a welcome addition to your life, as it has become to mine 😉

Anyway, that was breakfast.

Dinner came from her cookbook as well and was the broccoli & cashew cheese-quinoa burrito. Another recipe I won’t share but another sauce that deserves its own mention.

That cashew cheese sauce. Oh. My. God. Lick the bowl kind of good… Eat alone with a spoon kind of good… Yeah, today I was definitely having a moment with sauces/toppings.

This isn’t the exact same cheese recipe that’s in her cookbook but it’s pretty close:

Screen Shot 2015-06-14 at 6.28.37 PMI highly recommend it. I think what got me was the addition of Dijon – such a nice, subtle flavour. YUM!

For dessert I also tapped into the cookbook and made banana soft-serve ice cream topped with chopped strawberries and, yep you guessed it, some of the leftover coconut whipped cream. A perfect dish to end a day of perfect meals.

IMG_3939

She’s working on a new cookbook and I’m pretty stoked for it. She knocked it out of the park with OSG1 so I have nothing but high expectations for OSG2. It’s a sequel I’m actually excited for!

Lunches (and dinners) for dayzzzzz

A cooking post! Woooo! First one in awhile, I know. And unfortunately it’s a little bit of a tease because I’m not posting one of the recipes below (buy the cookbook!)… But whatever 1/2 isn’t bad.

I’ll admit, this took so long to come up with because I haven’t actually COOKED anything since before my trip to Costa Rica… so that would December 2014. Yikes. But I’m back on track as a culinary goddess so never fear!

So, boring fact about me (one of many): I pretty much eat the same thing everyday, Monday-Friday.
The reason for it is a mix of laziness + saving money attempts + trying to ensure a healthy diet. It’s just so much easier to accomplish all those goals when you have an eating schedule!
That means every week I sit down and decide what lunch (which I pack and bring with me to work) and dinner (which I scarf down after getting home from work before rushing off to whatever social plan I have going on) will be for the week. Then I buy all the ingredients, do one big cooking sesh and pack away it in my fridge for easy grab-and-go consumption during the week.*
Last week the winners both came from the Oh She Glows recipe bank – one from the cookbook, one from the website. And they were definitely winners.
Let’s start with the first one: lunch
Protein Power Goddess Bowl
IMG_3640
This week I took a page from Angela’s book and got my protein on. Her protein power bowl is for sure filled with both – I was full for the rest of the afternoon and had enough energy to avoid succumbing to the mid-afternoon drowsy I-want-to-go-home-and-sleep stage I usually feel at work. Plus it was absolutely delicious. A fantastic work lunch.
The recipe features lentils, spelt berries, onion, garlic, red pepper, tomato, spinach and parsley. I could not find spelt berries anywhere in my grocery store so I used quick-cooking farrow instead. Also, I subbed out the red onion (the worst of the onion family IMO) for leek. This mixture is coated in a super yummy lemon-tahini dressing. Honestly guys, I ate this bowl everyday for four days straight and not once did I get sick of it. It is so tasty. I think it will be back in the rotation very soon…
It was really easy to make; the dressing is combining all the ingredients in your blender, the bowl is cooking the lentils, farrow then mixing everything else together in a large skillet. It makes a HUGE quantity so, again, it’s excellent if you’re meal planning for the week or if you’re feeding a hungry crowd.
One of my favourite lunches so far, for sure.
And last but not least: dinner
IMG_3645
The weather has finally started warming up here in Toronto so I decided to celebrate with a spring-inspired salad. I don’t like eating too many carbs at dinner so salads are my usual go-to for weekday evening meals. I made this salad for my family at Easter last year and it was a hit so I decided to revisit it.
Screen Shot 2015-04-19 at 9.05.41 PM
I did add  the  strawberries but not to the pan or in the tupperware that I stored the leftovers. Last year I found that they got soggy when mixed together with the rest of the salad so this time I kept it in its own separate container and only added them to the bowl right before eating.
Overall, it is a nice, light meal and I always feel really good afterwards. Plus it looks so pretty! The dressing is great, too – I made an extra batch to keep in my fridge to add to my regular salads.
So there you have it. My meal planning secret is out. In case you’re wondering, my breakfast is Oh She Glows-inspired as well: Angela’s Classic Green Monster Smoothie. Every morning, yo.
IMG_3652
*weekends are a free-for-all, let’s be real. Some week nights, too. Maybe a lunch here and there. Basically this is me trying to have a weekly eating schedule and mostly succeeding…

The biggest staple in my diet

Hummus.

Well, that and peanut butter.

But today I’m talking about hummus so we’ll leave PB for another post.

Last week there was a catered lunch at the company I work at. It was buffet-style and my manager, who’s aware of my particular dietary habits, was ahead of me in the line. I skipped the Greek salad, took some rice, skipped the chicken skewers, and pretty much hit the end of the line. My manger, noticing my sad looking plate, looked at the end of the buffet and said, “There’s pita and hummus up there. Can you eat hummus?”

If I couldn’t, I would be one sad, sad, sad vegan. Actually if that were the case I probably would’ve abandoned veganism a long time ago. Hummus (and chickpeas) play a starring role in many of meals. It’s the dressing I use for salads, the “sauce” I put on my sandwiches, the stand-in protein I add when my plate is looking a little too  vegetable-centric (which was the case for that particular lunch).

So that’s why finding the perfect hummus recipe was so important to me. As mentioned before, I have a love affair with my Vitamix so obviously I’d rather make it than buy it. I tried a couple recipes I found on Pinterest but nothing I’d made ever tasted quite right.

Until I found Angela Liddon’s hummus recipe. Aptly titled, “The Hummus That Changed Everything,” this was the only hummus I’d ever made that tasted as good, if not better, than the store-bought stuff. I’m pretty sure I did a happy dance around my kitchen after tasting it the first time I made it. My search was over!

I have a whole post dedicated to the greatness of Oh She Glows coming up so I won’t get into it here but it suffices to say that she is amazing. You can find her perfect hummus recipe below.


The perfect hummus recipe

Adapted from Oh She Glows
Makes 2 cups
Cook time: 5 mins

1 can unsalted chickpeas, some liquid reserved
2 tbsp reserved chickpea liquid
2 garlic cloves
1/2 – 1 tsp kosher salt
1/3 cup tahini
5-6 tbsp lemon juice
5 drops hot sauce

  1. Add all ingredients to your blender or food processor and mix at top speed, scraping down the sides as needed.
  2. Done! Serve drizzled with olive oil or whatever else you like on your hummus (I add Sriracha). Will last for about 5 days in a sealed container in the fridge.

Warming up to winter

It’s snowing and today is the Santa Claus parade in Toronto, how perfect is that? Well, perfect for people who like those kind of things.

While I didn’t go to the parade, I did the next best thing and curled up by the window with a cup of my homemade hot chocolate and admired the snow in all the SnapChat pictures my friends sent me.

Haaa, just kidding. But seriously, people. Snowfall isn’t some kind of miracle. I don’t need 100 pictures of it to believe it’s happening.

To be honest, winter is my least favourite season. It’s cold, it’s wet, it requires a lot of preparation and is (in my opinion) the most expensive season. So when it starts snowing in mid-November, I find it difficult to get excited. All I start thinking of is the winter tires I’m going to have put on my car, the new coat I’ll have to buy and having to trudge through icy snow banks anytime I go outside. Thankfully hot chocolate exists, which makes everything a little better. Sipping a good cup of hot chocolate can make even the worst snowstorm seem kind of romantic.

I’m pretty picky about hot chocolate so awhile back I came up with my own recipe so I wouldn’t have to be continually disappointed by the store-bought mixes. I don’t like overly sweet things so I’m partial to dark chocolate vs regular chocolate. As well, I try to avoid white sugar so maple syrup is my go to sweetener. Andddd, obviously it wouldn’t be a true Erika-recipe if I didn’t find a way to include my Vitamix so you’ll notice one of the steps is to combine all the ingredients in a blender; I like how it adds a frothy texture to the drink and I don’t have to worry about any unmixed dark chocolate clumps floating around in the drink. But of course I’m sure mixing with a spoon will get the job done too.

It makes my taste buds happy and helps warm my cold heart in the winter. Which is kinda important when you live in Canada and winter is basically the national season.


Erika’s dark hot chocolate

Makes 1 serving
Cook time: 5 mins

1 cup original unsweetened almond milk
1 tbsp dark chocolate powder
1 tbsp pure maple syrup

  1. Warm almond milk on stove top or microwave, until it reaches desired temperature.
  2. Add warmed milk, chocolate powder and maple syrup to blender.
  3. Blend ingredients on low setting until thoroughly combined.
  4. Serve in your favourite mug.


Sunday morning waffles

Waffles on Sundays are pretty much mandatory, right? Especially if you’re like me and own a waffle maker, then it’s practically a sin if your breakfast/brunch is anything but.

So today I have a vegan waffle recipe for ya.

Something to note: I am extremely low on groceries so I made some creative adaptions to the original recipe. Everything turned out fantastic but if you’re not into them, I won’t be offended. As usual, I’ve linked to the original recipe so you can check it out.


Banana peanut butter waffles

Adapted from never homemaker
Makes 4 waffles
Prep time: 10 mins
Cook time: 10 mins

1/2 cup whole wheat flour
1/2 cup all purpose white flour
1 tbsp ground flax seed
1 tsp baking soda
1/4 tsp salt

1 large very ripe banana
1 tbsp maple syrup
3/4 cup water
1 tbsp coconut oil, melted
1/4 cup smooth peanut butter

  1. Plug in your waffle maker and lightly grease the panels
  2. In a large bowl, whisk together the dry ingredients
  3. In a separate bowl, mash the banana and then add the wet ingredients, mixing until well combined
  4. Combine the wet and dry ingredients and mix until well combined
  5. When heated, add the batter to your waffle maker and let cook until your waffle maker indicates it’s finished
  6. Serve with your favourite toppings and a hot cup of coffee/tea

IMG_2779

Sometimes the best nights are the ones you have with yourself

Happy Friday!

I was all set to write another edition of “Vegan in a different city” featuring Ottawa‘s finest vegan take-out this weekend… but at the last minute my travel buddy cancelled on me and so this weekend I am still a vegan in Toronto.

No worries because it allowed me to come to the very deep conclusion that is the title of this post and cook up a little vegan magic.

Tonight I’m staying in all by my lonesome with a bottle of rosé, a homemade (vegan) calzone and the Raptors game. And it is a wonderful, wonderful thing. Honestly – those are probably my top 3 favourite things.

Anyway, if you want to add some vegan magic to your Friday night the (very simple) recipe for my vegan calzone is below. Buy yourself a bottle of your favourite wine, put on your favourite show/movie/sports event and join me in having one of the best Friday nights in awhile.

The only thing that could make it any better is a win by the Raptors. Fingers crossed.


Vegan Magic Calzone

Serves 1 (or 2, if you’re not a pizza fiend like myself)
Prep time: 1 h 15 mins
Cook time: 30 mins

1/2 pizza dough (I used Longo’s brand)
1 cup Mom’s homemade tomato sauce (or your favourite tomato sauce)
1/2 cup Daiya mozzarella shredded cheese
1/4 cup black olives
1/4 cup sautéed mushrooms
1/4 cup sautéed sliced red pepper
1/4 cup thinly sliced zucchini rounds
1/4 cup steamed broccoli florets
2 tablespoons vegan butter, melted (I used Earth Balance)

  1. Take pizza dough out of your refrigerator and let rise for approx. 1 hour prior to use
  2. Preheat the over to 375 degrees Fahrenheit
  3. After an hour, on a floured surface, stretch out dough to a circle about 8″ in diameter
  4. Put vegetables and cheese in the centre of the circle, topping off with 1/4 of the tomato sauce (or more, if you like to keep things saucy)
  5. Fold the dough in half and crimp the sides together, so it holds while baking
  6. Bake on a lightly greased baking sheet in oven for 30 minutes. At the 15 minute mark, remove from oven and brush with melted butter (this will add a beautiful golden colour to your finished product) before putting back in for another 15
  7. Serve with the leftover tomato sauce for dipping and bottle of wine for sipping.

FullSizeRender copy

Samosa…soup?!

It’s a rainy, grey night in Toronto. Fall may have technically started last month but it’s definitely making itself felt tonight, forcing me to admit to myself that those warm, sunny summer evenings are officially a thing of the past (at least until next year).

So with the weather getting colder and it being a Monday and all, soup seemed like the most obvious choice for dinner. Warm, comforting, simple to make – it is exactly what this Monday called for.

I found a recipe for samosa soup a couple weeks ago that I’d bought all the ingredients for so I even had a soup recipe ready to go.

I’m a huge fan of Indian food. I’d even say it’s my favourite type of food. The spices, the flavours, the heat, the wide variety of vegan and vegetarian dishes… it’s just all so good. When I saw the samosa soup recipe I didn’t hesitate. Hell, I barely even read over the recipe before I pinned it. I just knew I was going to make it. Making actual samosas seems a little out of my league at this point but soup is something I can handle.

Samosa Soup
And it didn’t disappoint.

It was spicy. It was warm. It was filling.

With the blinds closed and some candles lit, I even managed to trick myself into forgetting it’s a cold, rainy night. So yeah, this soup was exactly what this Monday night needed.

The blended boiled potatoes made it perfectly thick and added a creamy texture. The addition of chickpeas and green peas were reminiscent of eating an actual samosa. I missed having the potato chunks though, so for next time I’m going to reserve a couple potatoes and add it in with the peas to honour the samosa a little better. Oh, and I’ll make sure to pick up some naan bread to go with it. YUM.

I made a few additions/subtractions to the original recipe, so that’s the version you’ll find below. If you want to check out the original just click here.


Samosa Soup
Adapted from Yup, It’s Vegan

Ingredients

    • 8 small potatoes, quartered with the skins on
    • 1/2 tsp. coconut oil
    • 3 green chilis, finely chopped
    • 3 cloves garlic, minced
    • 1/2 yellow onion, diced
    • teaspoon ground cumin
    • teaspoon ground coriander
    • 1/4 teaspoon ground turmeric
    • 1 teaspoon salt
    • 1/4 teaspoon cayenne pepper
    • 1 cup water
    • 2 cups vegetable broth
    • 1/2 cup coconut milk
    • juice of 1/2 of a lime
    • 1/2 cup cooked green peas,
    • 1/2 cup cooked chickpeas

Instructions

  1. In a large pot, add the potatoes along with enough water cover it. Bring to a boil, and cook until the potatoes are tender. Rinse, drain and set aside.
  2. Meanwhile, warm the coconut oil over medium heat in a skillet. Add the chilis, garlic, and onion, and stir. Cook for 3-5 minutes, until softened.
  3. Add all the spices and stir. Continue stirring frequently, cooking at medium heat for about 2 more minutes, until the spices are fragrant.
  4. Remove from the heat, and pour the mixture into a blender. Blend until mostly smooth.
  5. Add the cooked potatoes to the blender, reserving a couple for later. Add the water  and blend until smooth.
  6. Transfer the mixture to the pot and add the broth, coconut milk, and lime juice. Turn heat to high until it boils, then reduce to low.
  7. Let it simmer for about 15 minutes then stir in the peas and reserved potatoes. Adjust seasoning to your taste and serve warm.

Mmmmmmmm.

The epitome of comfort food

That is the first thought that went through my head when I tasted the finished product of this recipe. So. Good.

Too good, in fact. I made it before heading to yoga and got a little carried away with “tasting” it. Anyone who does hot yoga regularly knows the pain that comes with eating a full meal before class. Needless to say, I spent a fair bit of the class digesting in child’s pose.

I’m avid Pinterest user so it’s where I get most of my recipes. This recipe was no exception.

Follow my Vegan recipe board.

And what brought me to this recipe?

Well, for a reason I’m still not entirely sure of, this week a guy in my French course brought in squash for the entire class. I missed last week’s class where apparently there was a discussion about why this was a thing that was happening but the gist of it was that he’s a vegetarian and grows his own squash and made a joke (?) about bringing in squash for everyone and then did. Yeah… I don’t know. That was the explanation I got and I didn’t care enough to press it. I was just happy to have free squash!

I took my gift home and immediately began a Pinterest hunt for a recipe to use it in. I pinned a couple options but ultimately settled on this one: Creamy Squash Curry Quinoa. AKA: the epitome of comfort food.

squash-quinoa-3
Taken from http://pinchofyum.com/creamy-squash-curry-quinoa

Like, look at that. It looks like a hug in a bowl.

Anyway, it was a breeze to make and now I have enough leftovers to last me a week – not that I’m complaining! I will happily eat that for breakfast, lunch and dinner (will verify the accuracy of this statement next week).

Instructions are below (click image to enlarge). Here are some more of my thoughts on it:

  • Be wary of the serving size. It says it serves six so unless you’re feeding six very hungry people, I would recommend cutting it in half. I wasn’t kidding when I said I have enough leftovers to last me a week.
  • adore spicy food so the next time I make I will be adding chili peppers to the onion/garlic/squash puree. Sriracha complemented it quite well.
  • Total cooking time (including prep) was about 45 minutes – and most of that prep time was spent struggling to chop up that squash. If the recipe wasn’t so damn good I’m pretty sure I’d never cook Kabocha squash again based on that alone.
  • I used Daiya mozzarella “cheese” to keep it vegan.

Enjoy!

Screen Shot 2014-10-18 at 11.51.16 AM